
Home Blog Page 42

Hairline Tattoo: The Ultimate Solution for Permanent Hair Loss Treatment

0

Hair loss is a common problem that affects millions of people worldwide, and it can have a significant impact on their confidence and self-esteem. While there are various hair loss treatments available, some individuals may not find them effective, leaving them feeling self-conscious about their hairline. Fortunately, hairline tattoo or scalp micropigmentation is a permanent hair loss treatment that can help restore confidence and self-esteem.

What is Hairline Tattoo or Scalp Micropigmentation?

Hairline tattoo or scalp micropigmentation (SMP) is a non-surgical hair loss solution that involves depositing tiny, colored pigments into the scalp to simulate the appearance of hair follicles. The procedure is similar to tattooing, but the pigments used are different and designed to match the natural hair color of the patient.

Scalp micropigmentation is a precise and intricate process that requires a skilled technician with experience in creating natural-looking results. The technician uses a micro-needle to deposit the pigments into the scalp, creating a series of small dots that mimic the look of real hair follicles.

The process of scalp micropigmentation typically takes several sessions to complete, with each session lasting a few hours. The number of sessions required depends on the extent of the hair loss, the desired outcome, and the quality of the patient’s scalp. However, most patients typically require two to three sessions to achieve the desired result.

Who is a Candidate for Hairline Tattoo or Scalp Micropigmentation?

Hairline tattoo or scalp micropigmentation is an excellent option for individuals who are experiencing hair loss or thinning hair, including those with alopecia or male pattern baldness. It is suitable for both men and women of all ages, skin types, and hair colors.

Scalp micropigmentation is also an excellent option for individuals who have undergone hair transplant surgery but are still experiencing hair loss or thinning. It can help improve the density and coverage of the transplanted hair, creating a more natural-looking result.

Hairline Tattoo: The Ultimate Solution for Permanent Hair Loss Treatment

Benefits of Hairline Tattoo or Scalp Micropigmentation

  1. Permanent Solution: Scalp micropigmentation is a permanent hair loss solution that can last for several years. Unlike other hair loss treatments, such as hair transplant surgery or medication, scalp micropigmentation does not require ongoing maintenance or follow-up appointments. Hair Loss Treatment
  2. Non-Surgical: Scalp micropigmentation is a non-surgical hair loss solution that does not require incisions or anesthesia. It is a minimally invasive procedure that is relatively painless and has a quick recovery time.
  3. Customizable: Scalp micropigmentation is a customizable hair loss solution that can be tailored to the patient’s specific needs and desired outcome. The technician can adjust the pigment color, density, and placement to create a natural-looking result that complements the patient’s facial features.
  4. Instant Results: Scalp micropigmentation provides instant results that can be seen immediately after the procedure. Unlike other hair loss treatments, which can take months or even years to produce visible results, scalp micropigmentation provides an immediate improvement in the appearance of the hairline.
  5. Boosts Confidence: Hair loss can have a significant impact on an individual’s confidence and self-esteem. Scalp micropigmentation can help restore confidence by creating a natural-looking hairline that looks and feels like real hair.
  6. Cost-Effective: Scalp micropigmentation is a cost-effective hair loss solution that is more affordable than hair transplant surgery or other long-term hair loss treatments. It also requires less maintenance and follow-up appointments, making it a more convenient and cost-effective option for many patients.

Conclusion

Hairline tattoo or scalp micropigmentation is a permanent hair loss solution that can help restore confidence and self-esteem for individuals experiencing hair loss. It is a non-surgical, customizable, and cost-effective solution that provides instant results and requires minimal maintenance. Scalp micropigmentation is suitable for both men and women of all ages, skin types, and hair colors, making it an excellent option for anyone experiencing hair loss or thinning. Hair Loss Treatment

If you’re considering hairline tattoo or scalp micropigmentation, it’s essential to do your research and find a skilled technician with experience in creating natural-looking results. By choosing the right technician and undergoing the procedure, you can achieve a natural-looking hairline that looks and feels like real hair, boosting your confidence and self-esteem.

To know more about Skincare Devices and Beauty’s latest updates, please Like and Follow our Facebook and Instagram accounts…

Read also: Refresh and Rejuvenate: 3 Delicious Detox Water Recipes for Gorgeous Skin

Refresh and Rejuvenate: 3 Delicious Detox Water Recipes for Gorgeous Skin

0

Detox water has become a popular way to cleanse the body and promote glowing skin. It is an easy and effective way to hydrate and flush toxins out of your system. Detox water contains a variety of fruits, vegetables, and herbs that provide a range of health benefits, including improving digestion, boosting immunity, and improving skin health. In this article, we will discuss three super easy detox water recipes for glowing skin.

Lemon, Cucumber, and Mint Detox Water

Lemon, cucumber, and mint are popular ingredients for detox water. They are known for their refreshing taste and ability to promote hydration. Lemon contains citric acid, which aids digestion and detoxification. Cucumber is rich in antioxidants, which help fight free radicals that damage skin cells. Mint has anti-inflammatory properties, which can soothe the skin and help reduce inflammation.

To make this detox water, you will need:
  • 1 lemon, sliced
  • 1 cucumber, sliced
  • A handful of fresh mint leaves
  • 8 cups of water
Instructions:
  1. Wash the lemon, cucumber, and mint leaves.
  2. Slice the lemon and cucumber into thin slices.
  3. Add the lemon, cucumber, and mint leaves to a large pitcher.
  4. Pour 8 cups of water into the pitcher.
  5. Stir well and refrigerate overnight.
  6. Enjoy your refreshing and detoxifying lemon, cucumber, and mint detox water the next day.

Strawberry, Lemon, and Basil Detox Water

Strawberry, lemon, and basil are an excellent combination for detox water. Strawberries are packed with antioxidants, which help fight inflammation and protect against sun damage. Lemon, as previously mentioned, helps flush toxins out of your body. Basil is also rich in antioxidants and has anti-inflammatory properties that can help soothe and calm the skin.

Refresh and Rejuvenate: 3 Delicious Detox Water Recipes for Gorgeous Skin

To make this detox water, you will need:
  • 1 cup of sliced strawberries
  • 1 lemon, sliced
  • A handful of fresh basil leaves
  • 8 cups of water
Instructions:
  1. Wash the strawberries, lemon, and basil leaves.
  2. Slice the lemon and strawberries into thin slices.
  3. Add the lemon, strawberries, and basil leaves to a large pitcher.
  4. Pour 8 cups of water into the pitcher.
  5. Stir well and refrigerate overnight.
  6. Sip on this refreshing and detoxifying strawberry, lemon, and basil detox water the next day.

Pineapple, Orange, and Ginger Detox Water

Pineapple, orange, and ginger are a delicious combination for detox water. Pineapple is rich in bromelain, an enzyme that aids digestion and reduces inflammation. Oranges are loaded with vitamin C, which helps protect the skin from free radicals and aids collagen production. Ginger has anti-inflammatory and antioxidant properties, which can help reduce skin inflammation and improve skin health.

To make this detox water, you will need:
  • 1 cup of diced pineapple
  • 1 orange, sliced
  • 1-inch piece of fresh ginger, peeled and sliced
  • 8 cups of water
Instructions:
  1. Wash the pineapple, orange, and ginger.
  2. Dice the pineapple and slice the orange into thin slices.
  3. Peel the ginger and slice it into thin pieces.
  4. Add the pineapple, orange, and ginger to a large pitcher.
  5. Pour 8 cups of water into the pitcher.
  6. Stir well and refrigerate overnight.
  7. Enjoy your refreshing and detoxifying pineapple, orange, and ginger detox water the next day.

In conclusion, detox water is an excellent way to cleanse your body and promote glowing skin. The three super easy detox water recipes we have discussed in this article are perfect for achieving radiant skin.

To know more about Skincare Devices and Beauty’s latest updates, please Like and Follow our Facebook and Instagram accounts…

Read also: Age is Just a Number: 5 Scientifically Proven Anti-Aging Strategies

Gentle and Effective: How to Give a Lymphatic Drainage Massage

The lymphatic system is an essential part of our body’s immune system that helps to eliminate toxins and waste products from the body. However, due to sedentary lifestyles and poor dietary habits, the lymphatic system can become sluggish, leading to a buildup of toxins in the body. Lymphatic drainage massage is an effective technique to stimulate the lymphatic system, promoting lymph flow and eliminating toxins. In this article, we will discuss how to perform a lymphatic drainage massage.

What is a Lymphatic Drainage Massage?

Lymphatic drainage massage is a gentle massage technique that targets the lymphatic system. It involves using a series of gentle strokes and pressures on the skin’s surface to stimulate lymph flow, increase lymphatic circulation, and eliminate waste products from the body. The massage is done using light, rhythmic strokes that encourage lymph flow towards the lymph nodes.

Lymphatic drainage massage can be done on any part of the body, but it is typically done on the arms, legs, abdomen, and face. The massage is done with the client lying on a massage table, covered with a sheet, and the therapist uses gentle strokes, starting at the neck and working their way down the body.

Preparation for Lymphatic Drainage Massage

Before performing a lymphatic drainage massage, it is essential to prepare the client’s body. This involves:

  • Removing any jewelry, watches, or clothing tha
  • t could interfere with the massage.
  • Asking the client to lie down comfortably on the massage table.
  • Placing a pillow under the client’s head and a bolster under their knees for support and comfort.
  • Covering the client’s body with a sheet, leaving only the area to be massaged exposed.
  • Using a light massage oil, lotion, or cream to reduce friction and provide a smooth surface for the massage strokes.

Techniques for Lymphatic Drainage Massage

The lymphatic drainage massage involves a series of gentle, repetitive strokes and pressures that encourage lymph flow towards the lymph nodes. Here are some techniques for performing a lymphatic drainage massage:

  1. Effleurage:

Effleurage is a gentle, sweeping stroke that is used to start and finish the lymphatic drainage massage. It involves using the palms of your hands to glide over the skin’s surface, starting at the neck and working your way down the body. Effleurage is done with light pressure and is repeated several times to encourage lymph flow towards the lymph nodes.

  1. Petrissage:

Petrissage is a kneading technique that is used to stimulate lymph flow in deeper tissues. It involves using the fingers and palms to compress and release the skin and underlying tissues. Petrissage is done with light pressure and is repeated several times on each area of the body.

  1. Tapotement:

Tapotement is a light tapping or drumming technique that is used to stimulate lymph flow in the skin’s surface. It involves using the fingers or palms to tap or drum on the skin, starting at the neck and working your way down the body. Tapotement is done with light pressure and is repeated several times on each area of the body.

  1. Lymphatic Pump:

The lymphatic pump is a technique that is used to stimulate lymph flow in the lymphatic vessels. It involves using the hands to create a pumping action on the skin, starting at the neck and working your way down the body. The lymphatic pump is done with light pressure and is repeated several times on each area of the body.

  1. Stretching:

Stretching is a technique that is used to stimulate lymph flow in the deeper tissues. It involves using the hands to gently stretch and release the skin and underlying tissues. Stretching is done with light pressure and is repeated several times on each area of the body.

Gentle and Effective: How to Give a Lymphatic Drainage Massage

Here are some tips for performing a lymphatic drainage massage:

  1. Communicate with the client:

Before starting the massage, communicate with the client to understand their needs and any areas of concern. It is essential to inform them about the massage techniques and how they will feel during the massage.

  1. Use light pressure:

Lymphatic drainage massage is a gentle massage technique, so use light pressure throughout the massage. Heavy pressure can cause discomfort and may not stimulate lymph flow effectively.

  1. Use a proper technique:

Use proper technique when performing the massage strokes to ensure effective lymph flow. Proper technique involves using a light touch, working slowly and methodically, and using a repetitive motion.

  1. Work in the right direction:

This massage technique is done in a specific direction, which is towards the lymph nodes. Always work in the direction of the lymph nodes, starting at the neck and working your way down the body.

  1. Stay hydrated:

Lymphatic drainage massage can cause the body to eliminate toxins, so it is essential to encourage the client to drink plenty of water after the massage. Staying hydrated will help the body flush out toxins effectively.

To know more about Skincare Devices and Beauty’s latest updates, please Like and Follow our Facebook and Instagram accounts…

Read also: Age is Just a Number: 5 Scientifically Proven Anti-Aging Strategies

Is it Time to Add Vitamin C to Your Skincare Routine?

0

Vitamin C is a potent antioxidant that offers a wide range of benefits for the skin. It’s an essential nutrient that the body needs to produce collagen, which is necessary for skin health. Vitamin C can also help to brighten the complexion, fade dark spots, and protect the skin from environmental stressors. As a result, it’s no wonder that vitamin C has become a popular ingredient in many skincare products. But when should you introduce it into your skincare routine, and how should you use it?

First, it’s essential to understand that not all vitamin C is created equal. There are different forms of vitamin C, each with varying degrees of stability and efficacy. The most common forms of vitamin C found in skincare products are L-ascorbic acid, ascorbyl palmitate, and sodium ascorbyl phosphate. Of these, L-ascorbic acid is considered the gold standard due to its high potency and effectiveness.

So, when should you introduce vitamin C into your skincare routine? The answer is that it depends on your skin type and concerns. If you have sensitive skin or are prone to breakouts, it’s best to introduce vitamin C slowly and start with a low concentration. You can begin with a vitamin C serum or cream that contains 5-10% L-ascorbic acid and use it every other day. Once your skin adjusts to the product, you can gradually increase the frequency and concentration.

If you have normal to dry skin and are concerned about fine lines, wrinkles, and uneven skin tone, you can introduce vitamin C into your skincare routine sooner. A vitamin C serum or cream with a concentration of 10-20% L-ascorbic acid can be used daily or every other day, depending on your skin’s tolerance.

When incorporating vitamin C into your skincare routine, it’s essential to pay attention to the formulation and how it fits into your existing routine. Vitamin C is most effective when used in conjunction with other antioxidants and sunscreen. Look for products that contain vitamin E, ferulic acid, or niacinamide, which can enhance the effectiveness of vitamin C and provide additional benefits for the skin.

Is it Time to Add Vitamin C to Your Skincare Routine?

If you’re using a vitamin C serum, apply it after cleansing and toning but before moisturizing. Serums are lightweight and absorb quickly, making them an ideal first step in your skincare routine. If you’re using a vitamin C cream, you can apply it after your moisturizer or mix it with your moisturizer for added hydration and protection.

It’s important to note that vitamin C can be sensitive to light and air, which can cause it to degrade and lose effectiveness. Look for products that come in opaque or airtight packaging to ensure that the vitamin C remains stable and potent.

If you’re using a vitamin C serum or cream for the first time, it’s normal to experience some tingling or mild irritation. This is a sign that the product is working and should subside after a few minutes. However, if you experience any redness, itching, or swelling, discontinue use and consult a dermatologist.

In conclusion, vitamin C can be a beneficial addition to your skincare routine, but it’s essential to introduce it gradually and pay attention to the formulation and concentration. Start with a low concentration and gradually increase the frequency and potency as your skin adjusts. Look for products that contain vitamin E, ferulic acid, or niacinamide, and apply them after cleansing and toning but before moisturizing. And always remember to protect your skin with sunscreen, especially when using vitamin C, as it can increase the skin’s sensitivity to the sun. With these tips in mind, you can enjoy the many benefits that vitamin C has to offer for healthy, glowing skin.

To know more about Skincare Devices and Beauty’s latest updates, please Like and Follow our Facebook and Instagram accounts…

Read also: Age is Just a Number: 5 Scientifically Proven Anti-Aging Strategies

Mastering the Art of Oily Skin Care: Expert Tips and Advice

0

Oily skin can be a frustrating and difficult problem to deal with. It can lead to breakouts, shiny skin, and an overall greasy appearance. But understanding why your skin is oily and how to control it can make all the difference. In this article, we’ll explore what you should know about oily skin care and the best ways to control it.

What causes oily skin?

The sebaceous glands in your skin produce sebum, a natural oil that keeps your skin moisturized and healthy. However, when these glands produce too much sebum, it can lead to oily skin. There are several factors that can contribute to overactive sebaceous glands, including:

  1. Genetics: Oily skin can be inherited, so if one or both of your parents have oily skin, there’s a good chance you will too.
  2. Hormones: Changes in hormone levels, such as those that occur during puberty, menstruation, pregnancy, or menopause, can trigger an increase in sebum production.
  3. Diet: Consuming too much oily or greasy food can also contribute to oily skin.
  4. Skincare routine: Using the wrong skincare products or over-washing your face can strip your skin of its natural oils, causing your sebaceous glands to produce more sebum to compensate.

Mastering the Art of Oily Skin Care: Expert Tips and Advice

How to control oily skin

If you have oily skin, there are several steps you can take to control it and improve the appearance of your skin.

  1. Wash your face twice a day: Washing your face too frequently can strip your skin of its natural oils, causing your sebaceous glands to produce more sebum. However, not washing your face enough can lead to a buildup of oil and bacteria. It’s important to find the right balance by washing your face twice a day with a gentle cleanser.
  2. Use the right skincare products: Look for skincare products that are specifically designed for oily skin. These products will typically contain ingredients like salicylic acid, benzoyl peroxide, or glycolic acid, which can help to unclog pores and reduce sebum production. However, be careful not to use products that are too harsh, as they can strip your skin of its natural oils and cause irritation.
  3. Use a toner: Toners can help to remove any remaining traces of oil, dirt, or makeup after cleansing. Look for toners that contain witch hazel, which has astringent properties that can help to tighten pores and control oil production.
  4. Moisturize: Even though you have oily skin, it’s still important to moisturize. Look for oil-free, non-comedogenic moisturizers that won’t clog your pores.
  5. Use blotting papers: If you’re prone to oily skin throughout the day, carry blotting papers with you. These can help to absorb excess oil and reduce shine without removing your makeup.
  6. Avoid touching your face: Touching your face can transfer bacteria and oil from your hands to your skin, which can lead to breakouts. Try to avoid touching your face as much as possible.
  7. Exfoliate: Regular exfoliation can help to remove dead skin cells and unclog pores. However, be careful not to overdo it, as too much exfoliation can cause irritation and dryness.

In addition to these steps, there are also some lifestyle changes you can make to help control oily skin:

  1. Eat a healthy diet: Consuming a healthy diet can help to reduce oil production. Avoid eating too much oily or greasy food, as this can contribute to oily skin.
  2. Stay hydrated: Drinking plenty of water can help to keep your skin hydrated and healthy.
  3. Manage stress: Stress can trigger an increase in sebum production, so it’s manage your stress levels. Try to find ways to relax, such as yoga, meditation, or deep breathing exercises.
  1. Get enough sleep: Lack of sleep can also contribute to oily skin, so make sure you’re getting enough rest.
  2. Exercise regularly: Regular exercise can help to regulate hormone levels and reduce stress, both of which can contribute to oily skin.

In conclusion, oily skin can be frustrating, but it’s important to remember that it’s a common problem that can be managed with the right skincare routine and lifestyle changes. By following these tips, you can control oily skin and improve the overall health and appearance of your skin.

To know more about Skincare Devices and Beauty’s latest updates, please Like and Follow our Facebook and Instagram accounts…

Read also: Age is Just a Number: 5 Scientifically Proven Anti-Aging Strategies

Beauty Mistakes: 5 Dangers of Leaving Makeup on While You Sleep

0

We all have been there – too tired to remove our makeup after a long day, and we think it’s just this once. However, this beauty mistakes can have severe consequences for our skin. Sleeping with makeup on can cause significant damage to our skin, and we often overlook the dangers associated with it. In this article, we will discuss the five dangers of sleeping without removing your makeup.

  1. Clogged Pores

One of the most apparent dangers of sleeping with makeup on is the clogging of pores. The skin on our face is sensitive, and it needs to breathe to maintain a healthy complexion. When we don’t remove our makeup, it clogs our pores, preventing them from breathing, and ultimately causing breakouts, blackheads, and whiteheads. This is because the makeup and dirt trap the bacteria and oil on the skin, causing inflammation and pore congestion. Over time, this can lead to more significant issues like acne and skin infections.

  1. Premature Aging

Sleeping with makeup on can also lead to premature aging. The skin around our eyes is delicate and requires special attention. When we leave mascara, eyeliner, or eye shadow on while we sleep, it can cause irritation, and rubbing your eyes can cause wrinkles. Makeup also damages the collagen in the skin, which is responsible for keeping it firm and youthful-looking. With time, this can lead to fine lines, wrinkles, and a loss of elasticity, making you look older than you are. Beauty Mistakes

  1. Infections

Leaving makeup on for prolonged periods can create a breeding ground for bacteria on the skin. It provides the perfect environment for bacteria and other pathogens to grow, leading to infections. This is particularly true for the eye area, where bacteria can thrive, leading to pink eye or other eye infections. These infections can be painful, irritating, and even lead to long-term damage to the eyes.

  1. Dry and Irritated Skin

Sleeping with makeup on can also cause dry, irritated skin. Makeup products contain chemicals that can cause skin irritation when left on for too long. The skin around our eyes is particularly susceptible to dryness and irritation, which can lead to dark circles, puffiness, and fine lines. If you have sensitive skin, this can be even more problematic, leading to rashes and other allergic reactions.

  1. Dull Complexion

Lastly, sleeping with makeup on can give you a dull complexion. When we sleep, our skin repairs and rejuvenates itself. However, if we leave makeup on, this process is hindered. The makeup acts as a barrier, preventing the skin from breathing and receiving the nutrients it needs to rejuvenate itself. Over time, this can lead to a dull complexion, making you look tired and aged.

In conclusion, sleeping with makeup on can have severe consequences for our skin. It can lead to clogged pores, premature aging, infections, dry and irritated skin, and a dull complexion. It’s crucial to make it a habit to remove your makeup before going to bed. This simple step can make a significant difference in the health and appearance of your skin. Additionally, it’s essential to choose high-quality, natural products that are gentle on your skin and won’t cause irritation. Taking care of your skin is essential, and it starts with small steps like removing your makeup before bed.

To know more about Skincare Devices and Beauty’s latest updates, please Like and Follow our Facebook and Instagram accounts…

Read also: Age is Just a Number: 5 Scientifically Proven Anti-Aging Strategies

The Ultimate Guide to Healing Tooth Decay: 6 Easy Steps

0

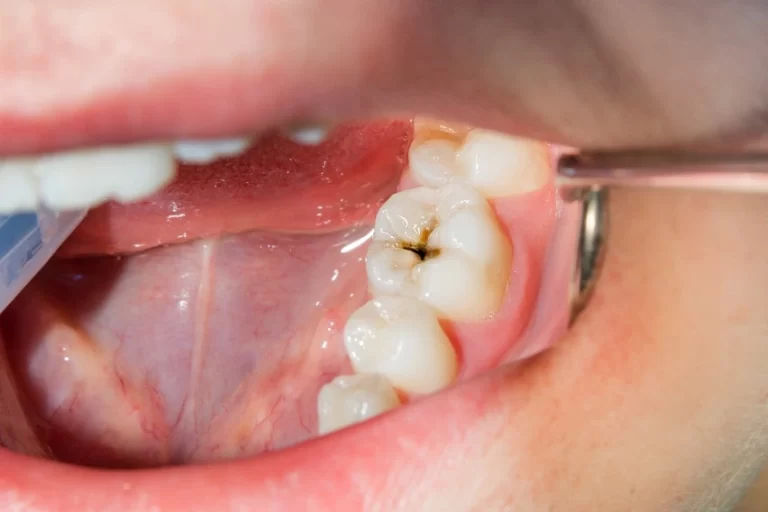
Tooth decay is a common dental problem that affects millions of people worldwide. Cavities, which are the holes that form in teeth due to tooth decay, can cause pain and discomfort, and if left untreated, they can lead to serious dental problems. Fortunately, there are simple and effective ways to heal tooth decay and reverse cavities. In this article, we’ll explore six of these methods.

  1. Brush and Floss Regularly

The most important step in preventing and healing tooth decay is to practice good oral hygiene. Brush your teeth twice a day with fluoride toothpaste and floss at least once a day. Brushing and flossing help remove plaque, a sticky film of bacteria that forms on teeth and contributes to tooth decay. Plaque can harden into tartar, which is difficult to remove with brushing and flossing alone. Regular dental cleanings can help remove tartar and prevent cavities.

  1. Reduce Your Sugar Intake

Sugar is one of the main culprits behind tooth decay. The bacteria in plaque use sugar to produce acid, which erodes tooth enamel and leads to cavities. Reducing your sugar intake can help prevent cavities. Avoid sugary drinks like soda and sports drinks, and limit your consumption of candy and sweets. Choose water or unsweetened beverages instead, and opt for fresh fruit as a sweet snack.

  1. Use Fluoride

Fluoride is a mineral that helps strengthen tooth enamel and prevent tooth decay. It is found in many toothpastes, mouthwashes, and community water supplies. Using fluoride products can help prevent cavities. Talk to your dentist about whether a fluoride rinse or treatment is right for you.

The Ultimate Guide to Healing Tooth Decay: 6 Easy Steps

  1. Eat a Healthy Diet

Eating a healthy diet rich in nutrients like calcium, phosphorus, and vitamin D can help strengthen teeth. Calcium and phosphorus are essential for building strong teeth, while vitamin D helps the body absorb calcium. Foods like dairy products, leafy greens, and fish are good sources of these nutrients. Avoid sugary and acidic foods, which can erode tooth enamel and contribute to tooth decay.

  1. Oil Pulling

Oil pulling is an ancient Ayurvedic practice that involves swishing oil in the mouth for several minutes to improve oral health. Some studies suggest that oil pulling may help reduce bacteria in the mouth. Coconut oil is a popular choice for oil pulling, as it has antibacterial properties and a pleasant taste. To try oil pulling, swish a tablespoon of coconut oil in your mouth for 10-20 minutes, then spit it out and rinse your mouth with water.

  1. Use Natural Remedies

There are several natural remedies that may help heal tooth decay and reverse cavities. For example, xylitol is a natural sweetener that has been shown to reduce the amount of bacteria in the mouth and prevent tooth decay. Chewing xylitol gum or using xylitol-containing toothpaste may help prevent cavities. Other natural remedies that may help prevent tooth decay include green tea, licorice root, and neem oil.

In conclusion, tooth decay and cavities can be prevented and even reversed with simple and effective strategies. Practicing good oral hygiene, reducing your sugar intake, using fluoride, eating a healthy diet, trying oil pulling, and using natural remedies can all help improve your oral health and prevent tooth decay. Remember to visit your dentist regularly for check-ups and cleanings, and to address any dental problems as soon as possible. By taking care of your teeth and gums, you can enjoy a healthy and beautiful smile for years to come.

To know more about Skincare Devices and Beauty’s latest updates, please Like and Follow our Facebook and Instagram accounts…

Read also: Age is Just a Number: 5 Scientifically Proven Anti-Aging Strategies

The Pros and Cons of Liposuction: What You Need to Know

0

Liposuction, also known as lipo, is a cosmetic surgical procedure that removes fat deposits from specific areas of the body to improve its contour and shape. It is one of the most common cosmetic surgeries performed worldwide, with over 250,000 procedures done in the United States alone in 2021. While liposuction has been proven effective in reducing stubborn fat deposits, it also carries risks and potential complications that should be considered before deciding to undergo the procedure.

Benefits of Liposuction:

  1. Improved body contour: Liposuction is an effective way to get rid of stubborn fat pockets in specific areas of the body, including the hips, thighs, abdomen, arms, and chin. This can lead to a more defined body contour and improved overall appearance.
  2. Boost in self-confidence: Liposuction can help patients feel better about their appearance and boost their self-confidence. Many people who undergo liposuction report feeling more comfortable wearing certain types of clothing and engaging in activities they previously avoided.
  3. Enhanced health: Liposuction can also improve certain health conditions, such as lipomas (benign fatty tumors), gynecomastia (enlarged male breasts), and lipodystrophy syndrome (a disorder that causes abnormal fat distribution).
  4. Long-lasting results: Liposuction results are typically long-lasting, as long as patients maintain a healthy diet and exercise regularly. Fat cells that are removed during liposuction do not return, but it’s still possible to gain weight in other areas of the body.

The Pros and Cons of Liposuction: What You Need to Know

Risks of Liposuction:

  1. Pain and discomfort: Liposuction is a surgical procedure that involves making incisions and inserting a cannula to remove fat. As with any surgery, patients can experience pain and discomfort during and after the procedure.
  2. Swelling and bruising: Swelling and bruising are common side effects of liposuction and can take several weeks to subside. Compression garments and lymphatic massage can help reduce swelling and bruising.
  3. Infection: As with any surgical procedure, there is a risk of infection. Patients should take proper care of the incision sites and follow post-operative instructions carefully to reduce the risk of infection.
  4. Bleeding: Liposuction involves making incisions, which can result in bleeding. In rare cases, bleeding can be severe and require additional medical attention.
  5. Numbness and nerve damage: Liposuction can cause temporary numbness or permanent nerve damage, particularly in the areas where the cannula was inserted.
  6. Uneven results: Liposuction is not always able to achieve perfect symmetry or remove all of the targeted fat cells. In some cases, patients may require a second procedure to achieve their desired results.
  7. Scarring: It incisions can result in scarring, although they are typically small and located in inconspicuous areas. Proper wound care and following post-operative instructions can help reduce scarring.
  8. Blood clots: There is a risk of blood clots, particularly in the legs, after any surgery. Patients should be up and moving as soon as possible after the procedure and wear compression garments to reduce the risk of blood clots.

In conclusion, liposuction can be an effective way to remove stubborn fat deposits and improve body contour and self-confidence. However, like any surgical procedure, it carries risks and potential complications that should be carefully considered before deciding to undergo the procedure. Patients should discuss their concerns and expectations with their surgeon and follow all post-operative instructions to reduce the risk of complications and achieve the best possible results.

To know more about Skincare Devices and Beauty’s latest updates, please Like and Follow our Facebook and Instagram accounts…

Read also: Age is Just a Number: 5 Scientifically Proven Anti-Aging Strategies

Age is Just a Number: 5 Scientifically Proven Anti-Aging Strategies

0

Aging is a natural process that affects everyone, but there are ways to slow down its effects on the body. Anti-aging strategies can help you maintain a healthy body and mind as you age. Here are five proven anti-aging strategies that can help you live a longer, healthier life.

1. Exercise Regularly

Regular exercise is one of the most effective anti-aging strategies. Exercise can help you maintain a healthy weight, improve your cardiovascular health, and boost your mood. Exercise has been shown to reduce the risk of chronic diseases such as heart disease, diabetes, and cancer. It also helps to strengthen your bones and muscles, which can help to reduce the risk of falls and fractures as you age.

To get the most benefit from exercise, it is important to include both cardio and strength training in your routine. Aim to get at least 30 minutes of moderate-intensity exercise five days a week, and incorporate strength training at least twice a week. Activities such as walking, swimming, cycling, and yoga are great options for older adults.

2. Follow a Healthy Diet

Eating a healthy diet is another essential anti-aging strategy. A diet that is high in fruits, vegetables, whole grains, and lean protein can help to reduce inflammation in the body, which is linked to many age-related diseases. In addition, a healthy diet can help to maintain a healthy weight and provide your body with the nutrients it needs to function properly.

To follow a healthy diet, focus on eating a variety of colorful fruits and vegetables, whole grains, and lean protein sources such as fish, poultry, and beans. Limit your intake of processed foods, sugary drinks, and saturated and trans fats. Drink plenty of water to stay hydrated.

Age is Just a Number: 5 Scientifically Proven Anti-Aging Strategies

3. Get Enough Sleep

Getting enough sleep is important for overall health and can also help to slow down the aging process. During sleep, the body repairs and regenerates tissues, and sleep deprivation can lead to a range of health problems, including a weakened immune system, weight gain, and cognitive decline.

To get enough sleep, aim for seven to eight hours of sleep per night. Establish a regular sleep routine by going to bed and waking up at the same time each day, even on weekends. Avoid caffeine and alcohol in the evening, and create a relaxing sleep environment by keeping your bedroom cool, quiet, and dark.

4. Manage Stress

Stress can accelerate the aging process by increasing inflammation in the body and causing damage to cells. Chronic stress has been linked to a range of health problems, including heart disease, diabetes, and depression. Learning to manage stress is an important anti-aging strategy.

To manage stress, try techniques such as deep breathing, meditation, yoga, or tai chi. Engaging in activities that you enjoy, such as reading, gardening, or spending time with friends and family, can also help to reduce stress.

5. Stay Connected

Staying connected with others is an important anti-aging strategy. Social isolation and loneliness can have a negative impact on physical and mental health, and have been linked to a range of health problems, including depression, cognitive decline, and a weakened immune system.

To stay connected, make an effort to maintain social connections with friends and family members. Join a club or organization that interests you, volunteer in your community, or take a class to learn a new skill. Even small interactions, such as chatting with a neighbor or smiling at a stranger, can help to boost your mood and reduce feelings of loneliness.

In conclusion, aging is a natural process that affects everyone, but there are proven strategies that can help to slow down its effects on the body. Regular exercise, a healthy diet, getting enough sleep, managing stress, and staying connected with others are all important anti-aging strategies.

To know more about Skincare Devices and Beauty’s latest updates, please Like and Follow our Facebook and Instagram accounts…

Read also: Opus Plasma Skin Rejuvenation: The Revolutionary Skin Resurfacing Treatment

Say Goodbye to Shiny Skin: 7 Tips for Managing Oily Skin

0

For many people, having oily skin can be a constant struggle. While some oil on the face is natural and necessary for maintaining healthy skin, oily skin can lead to clogged pores, acne, and a shiny appearance. Fortunately, there are several ways to lessen the amount of oil on your face and achieve a more balanced, matte complexion.

1. Cleanse with a gentle, oil-free cleanser

One of the most important steps in managing oily skin is to keep it clean. However, harsh, drying cleansers can strip the skin of its natural oils, leading to an overproduction of sebum. Instead, opt for a gentle, oil-free cleanser that won’t irritate or dry out your skin. Look for products that contain salicylic acid or benzoyl peroxide, which can help to unclog pores and reduce inflammation.

2. Use a toner to balance pH levels

After cleansing, use a toner to help balance the pH levels of your skin. This can help to regulate oil production and prevent breakouts. Look for toners that contain witch hazel, tea tree oil, or other natural astringents that can help to tighten pores and reduce oiliness.

3. Moisturize with oil-free products

Contrary to popular belief, even oily skin needs moisturizer. Skipping moisturizer can actually make your skin produce even more oil in an attempt to compensate for the dryness. However, it’s important to choose the right moisturizer for your skin type. Look for oil-free, lightweight formulas that won’t clog pores or leave a greasy residue.

Say Goodbye to Shiny Skin: 7 Tips for Managing Oily Skin

4. Use blotting papers or powder throughout the day

If you’re prone to oily skin, it can be helpful to keep a pack of blotting papers or a compact of oil-absorbing powder on hand. These products can quickly and easily remove excess oil from your face, without disturbing your makeup or causing irritation. Simply blot or dust the affected areas as needed throughout the day.

5. Avoid touching your face

It’s a common habit to touch your face throughout the day, but this can actually exacerbate oiliness and lead to breakouts. The oils and bacteria from your hands can transfer to your face, clogging pores and causing inflammation. Try to avoid touching your face as much as possible, and if you must, make sure to wash your hands first.

6. Limit your use of heavy makeup

While makeup can be a great way to enhance your natural beauty, heavy, oil-based products can contribute to excess oil on the face. Instead, opt for lightweight, oil-free formulations that won’t clog pores or exacerbate oiliness. Look for products that are labeled “non-comedogenic” or “oil-free,” and try to limit your use of heavy foundations, concealers, and powders.

7. Adjust your diet and lifestyle

While skincare products can be helpful in managing oily skin, there are also several lifestyle changes that can make a difference. Eating a healthy, balanced diet that is rich in fruits, vegetables, and whole grains can help to regulate oil production and improve the overall health of your skin. Additionally, getting enough sleep, reducing stress, and exercising regularly can all contribute to a healthier, more balanced complexion.

In conclusion, managing oily skin can be a challenge, but it’s not impossible. By following these seven tips, you can help to reduce the amount of oil on your face and achieve a more balanced, matte complexion. Remember to be patient and consistent with your skincare routine, and don’t hesitate to seek the advice of a dermatologist if you’re struggling with persistent oiliness or acne.

To know more about Skincare Devices and Beauty’s latest updates, please Like and Follow our Facebook and Instagram accounts…

Read also: Opus Plasma Skin Rejuvenation: The Revolutionary Skin Resurfacing Treatment