Home Blog Page 392

How to Put Eyeliner on Small Eyes

As the “windows of your soul,” your eyes might be considered the most important part of your face. Enhance small eyes with eyeliner, which can brighten your eyes and make them seem bigger. Start by applying eyeliner to your upper lids. Experiment with ways to use less heavy liner on your lower lids so your eyes look bigger. You can also try lining your eyes with different colors that can really open up your eyes.

Lining Your Upper Lid

Apply taupe eye shadow along your upper lash line

Extend it to the crease in your eyelid. Draw a line from the middle of your upper eyelid to the outer corner with your eyeliner. Make the line a little thicker at the outer edge of your lid and have it taper in toward the center.

  • Make your eyes seem larger by only lining the outer ½ to ⅔ of your upper lid.

Smudge your liner

Blend and smudge the liner with your fingertip. Clean up any extra color with a clean fingertip or a quick wipe of concealer. Do this so your eyes look bigger than they would with a tight, well-defined line.

Set your eyeliner with brown eye shadow

Use an angled eyeliner brush to draw a line of shadow on top of your smudged eyeliner. Sweep a light pink eye shadow along the outer edges of your lid. Extend the pink shadow from the crease in your lid up to your brow bone. This will open up your eye and make it appear larger.

Blend your liner into your lashes for a more minimal look

Start in the inner corner of your eye. Make short strokes along the roots of your lashes with a creamy, dark-colored pencil. Keep the line thin and extend it across the entire upper lid of your eye. Doing this will make your lashes look fuller and your eyes seem bigger. Read More……..

Also Read:  Retinoids: Anti-Aging Benefits

Retinoids: Anti-Aging Benefits

What Are Retinoids?

Retinoids are one of the most popular ways to help skin look younger. They come from vitamin A and have been around since the early 1970s. Retinoids were first prescribed to treat acne. Now they’re used to fight aging skin, psoriasis, and other skin conditions. They come in many forms.

How Retinoids Work

Retinoids don’t just peel away the top layer of your skin cells like an extra strong loofah. They trigger your body to make more collagen, a protein in your skin, muscles, and bones. It’s what keeps your skin elastic and firm. This means fewer wrinkles.

Natural vs. Synthetic

There are natural and synthetic retinoids. Natural retinoids come directly from vitamin A. Synthetic retinoids are man-made. Both trigger receptors in your skin. But synthetic retinoids don’t trigger as many, so they tend to be less irritating. That also means they may not work as well.

Types of Retinoids

Retinoids come in cream, gel, and liquid forms. Gels are usually stronger than creams, foams, and liquids, and are typically prescribed for acne. Creams are usually a good choice for aging skin. Retinoids come in different strengths, including 0.025%, 0.05%, and 0.1%. Stronger formulas work better but can cause more side effects.

Retinoids for Wrinkles

Because retinoids help your skin make more collagen, they soften wrinkles and fine lines. They also stimulate new blood vessels, which can give your skin a rosy color. Retinoids also help fade age spots and smooth rough patches. Tretinoin (Retin-A) is a popular prescription choice for aging skin.

Prescription or Over-the-Counter?

You can buy some retinoids, like adapalene (Differin), at the store. But you need a prescription for stronger ones like tretinoin (Retin-A). You can also get retinols at the store, which your body then changes to retinoids. They’re not as strong, so they’re less likely to make your skin red or itchy. And they take longer to work. Read more

Read also: Skin Care Products That May Not Work


Skin Care Products That May Not Work

Anti-Cellulite Lotion

Lotion is a moisturizer that can hydrate your skin. This can make it look smoother. An anti-cellulite product with caffeine may tighten the surface of your skin for a little while. This can make your cellulite harder to see, but it doesn’t get rid of it. Lotion can’t get deep enough under your skin to break up your fat.

Try this instead: Talk to your dermatologist. There are treatments that can make your cellulite less noticeable.

Face Mist

You may feel refreshed when you add a bit of rose water mist to your morning routine. But spraying your face with droplets isn’t the best way to moisturize your skin. And if you have sensitive skin, a mist with fragrance may irritate it.

Try this instead: Put a layer of moisturizer on your damp skin. If you’re prone to acne, use oil-free products. They’re less likely to clog your pores.

Activated Charcoal Masks

Activated charcoal can absorb poisons or drugs in your stomach. But research is limited on how charcoal can help your skin. Some products, like face peels, may even have harmful ingredients. Always test a small patch of your body first.

Try this instead: You can get rid of dirt and bacteria by simply washing your face with water and a gentle cleanser.

Things That Promise Quick, Big Fixes

It can take a while to see a difference in your skin. Acne medicine may take 4 weeks or longer to work. Retinoids can improve fine lines, wrinkles, and the appearance of age spots. But you may not see results for 6 months.

Try this instead: Talk to your dermatologist about options other than surgery. You can try laser treatment, intense pulsed light therapy, or other resurfacing options.

Eye Cream

Ones with vitamin C or hydroquinone can lighten pigment under your eyes. (Use hydroquinone or bleaching agents only if your doctor says so.) But this won’t ease dark circles from visible blood vessels. The skin under your eyes is thin. You may notice more of a blueish tint as you age. It can also happen if you have allergies or you’re dehydrated.

Try this instead: Drink water and treat allergies. Talk to your dermatologist for more help. Read more

Read also: What You Should Know Before Getting Facial Fillers


What You Should Know Before Getting Facial Fillers

Types of Facial Fillers

Synthetic gels are the most common facial fillers. There are different brands, but they’re grouped by the natural body substance they mimic. This includes collagen, calcium hydroxyapatite, and hyaluronic acid, a sugar protein that attracts water. Some are stiffer and puff up your skin more than others.  Unlike other fillers, autologous fat injections call for surgery because they take fat from another part of your body.

Know Before You Go

Facial fillers involve a medical procedure. Schedule a consultation  to check out the facility and ask questions. You’ll be more relaxed if your treatment is on a different day.

Each state has rules for who can give facial filler shots. Look for a board-certified plastic surgeon, dermatologist, or ophthalmologist. Ask:

  • How did you become experienced in facial fillers?
  • Are you qualified to take care of any issues, no matter how rare?

Know Before You Go

Facial fillers involve a medical procedure. Schedule a consultation  to check out the facility and ask questions. You’ll be more relaxed if your treatment is on a different day.

Each state has rules for who can give facial filler shots. Look for a board-certified plastic surgeon, dermatologist, or ophthalmologist. Ask:

  • How did you become experienced in facial fillers?
  • Are you qualified to take care of any issues, no matter how rare?
  • Set a Goal

    Think hard about what you want fillers to do for your face — it’s not just about looking younger. You might want to get injections in stages so you can better direct the result. Ask your doctor for before-and-after photos. It’s important to know what success looks like. Read more

  • Read also: 8 Simple Ways to Banish Dry, Brittle Nails for Good


8 Simple Ways to Banish Dry, Brittle Nails for Good

0

There’s a special kind of power in having healthy, strong nails, whether you work the nail colors, go polish-free, or love nude nail colors. Healthy nail (and even the results of good nail cuticle care) are one of those less-visible confidence boosters, like wearing a fancy pair of underwear just because or splurging on amazing socks to wear under your boots.

Whether your nail care is a form of self-care, an indulgence, or just routine maintenance, keeping your nail in tip-top shape is a worthwhile investment. And here’s the good news: Healthy nails require an investment of time, not money.

The best route to stronger, longer nails is mostly through simple lifestyle habits, not pricy nail tools. But getting healthy nails also means kicking some bad habits, such as using your nails as a built-in pocket knife. For doable, helpful nail tips, we talked to the experts for the everyday dos and don’ts of nail care. Follow these steps, and you’ll have stronger, longer nails before you know it.

How to strengthen nails

1. Moisturize your nails

Moisturizing is a well-known secret to healthy skin, but it’s often overlooked in nail care. While dry, brittle nail can be the result of many factors, they’re ultimately a cry for moisture, so consider proper moisture the foundation of your nail care routine. When applying hand lotion, give your nails a little extra attention. There are plenty of moisturizing nail products on the market, but applying moisturizer is really only half the battle—there’s more to strong nail than a fancy cream or serum.

2. Leave your cuticles alone

It’s common practice to cut, push back, or try to get rid of cuticles altogether, but cuticles are not the enemy. In fact, the cuticle is “the nail’s natural protective seal,” according to Dana Stern, MD, a board-certified dermatologist and nail expert. Messing with your cuticles can do far more harm than good—even if a nail technician is the one doing the handiwork. Dr. Stern says a compromised cuticle can leave the nails vulnerable and at risk of infection.

Read More

Also Read: The 4 Best Ingredients for Acne Prone Skin

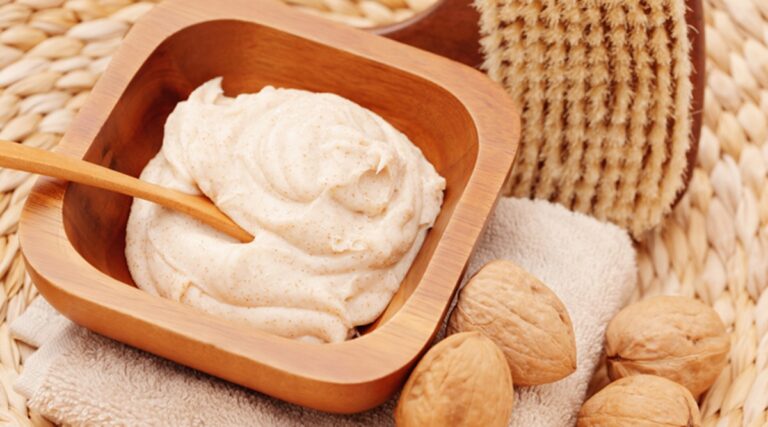
HOMEMADE WALNUT FACE SCRUB RECIPE

0

This homemade walnut face scrub is a quick answer to people who want to look their best in the shortest amount of time. I like this scrub because it is made with just two ingredients, can be used for all skin types, is very gentle on the skin and most importantly it is very quick and easy to make. This scrub is made with walnuts and fresh yogurt.

It is always fun and relaxing to do facial treatments. It is even greater fun, when it is done during the marriage ceremonies with all our cousins and friends. We all want to look our best during these important functions and most of us seek beauty parlors for a relaxing massage or a facial.

I got these organic walnuts from the health shop there, as I bake a lot. Ground walnuts nourishes the skin and it helps to exfoliate the dead cells without irritating the skin. When you make your own homemade products, you know what goes into it and it is a lot cheaper than what we buy in the shops.

Homemade Walnut Face Scrub 33Recipe

INGREDIENTS:

  • Ground Walnuts : 2 tbsp
  • Hung Yogurt : 2 tbsp

METHOD:

1. Tie the fresh yogurt in a muslin cloth or use a double layered strainer to drain all the water.

2. Pound the walnuts in a mortar and pestle till you get a coarse powder.

3. Add the yogurt and mix everything together.

4. Massage it gently on the face in circular motion for few minutes and wash off.

 NOTES:

  • Try to use this scrub both morning and night for best results.
  • Your face might feel greasy, especially if you are using full fat yogurt, wash your face later with a mild face wash.
  • Keep the left over scrub refrigerated. Read More………

Also Read: Potato Cucumber Ice Cubes For Dark Spots

The 4 Best Ingredients for Acne Prone Skin

0

Dealing with excessively oily skin can wash away your confidence. From fluctuating hormones to medication to genes, there are many reasons why you may be battling seborrhea—the medical term for oily skin. Thankfully, adding a few go-to products with oil-fighting ingredients to your beauty arsenal can reduce oiliness on the surface of the skin.

1. Salicylic Acid (BHA)

Tackle oily skin with a lotion, pad, gel or toner containing salicylic acid—a form of beta-hydroxy acid. It works as a liquid exfoliant to prevent excess oil from clogging pores and causing breakouts. Salicylic acid dissolves oil buildup on the surface of the skin while acting as an anti-inflammatory to reduce irritation.

2. Activated Charcoal and Clay

It’s tricky to soak up excess oil without over-drying the skin, but products containing activated charcoal and white clay do just that and work by attracting and absorbing dirt and oil in the skin, which then gets washed away. These ingredients, often found in masks and cleansers, are effective for both oily and acne-prone skin.

3. Benzoyl Peroxide

Available both by prescription and over the counter, benzoyl peroxide is the active ingredient in many acne products. Benzoyl peroxide helps kill bacteria, but those with sensitive skin should take caution, as it can be irritating. As with many treatments, it’s best to start with the lowest-strength option (2.5 percent) to see how your skin reacts and minimize the risk of irritation.

4. Retinol

It’s essential to adapt your daily skin care routine to suit your oily complexion. Opt for a serum or gel moisturizer containing retinol to help unclog pores and prevent future breakouts. Most over-the-counter and prescription retinol-based products can cause your skin to become extra sensitive to the sun, so use it at night to avoid burning and peeling. Read more 

Also read  Stay Away From These 5 Beauty Ingredients If You Have Sensitive Skin!

Lemon And Chia Water To Eliminate The Accumulated Fat

Lemon And Chia Water To Eliminate The Accumulated Fat

One of the most challenging and difficult things in life is losing weight. It can take months or even years. You may not believe it and I don’t blame you, because there is a magic and perfect mixture that has the ability to help you lose weight using healthy ingredients. It can cleanse your body from countless toxins. And don’t worry, it is very inexpensive and anyone can start trying it.

You’ll need four ingredients to get to make this drink and you probably already have them in your home.

Chia is an edible seed that comes from the desert plant Salvia hispanica, grown in Mexico dating back to Mayan and Aztec cultures. “Chia” means strength, and folklore has it that these cultures used the tiny black and white seeds as an energy booster. That makes sense, as chia seeds are a concentrated food containing healthy omega-3 fatty acids, carbohydrates, protein, fiber, antioxidants, and calcium. They’re supposed to help control hunger while they enhance your diet with super-nutrients. But what’s the real story on these nutritious seeds and their ability to help you lose weight?

Another key ingredient in this recipe is lemon juice.Lemons are a good source of vitamin C and of flavonoids, or antioxidants, which are thought to boost health and well being in several ways. They can help our organism expel any unwanted guests, such as parasites, toxins, and bacteria.

Honey  serves the purpose of sweetening the potion, and it also helps by increasing our organism’s ability to absorb nutrients. Honey is also full of anti-bacterial properties. Also, recent research shows that honey treatment may help disorders such as ulcers and bacterial gastroenteritis. It’s also packed with flavonoids that help reduce the risk of cancer It can also slow down the aging process of our cells, due to the high antioxidant presence. Make sure you buy the raw, organic variety, as store bought ones can be filled with artificial sugars that are harmful to our health.

You will need:

  • 1 tablespoon of chia seeds
  • Honey
  • Juice from 1 freshly squeezed lemon
  • 300 ml filtered water

Instructions:

Start by adding 100ml of water to a large cup and add the chia seeds to it. Let the seeds soak in water for one hour, until gelatinous mass forms on its own. Add the rest of the water, as well as the lemon juice to the mix. Mix with a spatula for a minute, until the ingredients are well-incorporated, than add the honey for sweetness.

A cup of this drink should be consumed in the morning before breakfast, your stomach should be totally empty .Do this for 3 days straight.

…..Read More…..

Read Also: Stay Away From These 5 Beauty Ingredients If You Have Sensitive Skin!….

Makeup Tips For Aging Skin

0

These makeup tips for aging skin will help older women apply makeup correctly. When it comes to aging skin, there are different makeup application tips, which when applied correctly, can erase years off the face! And remember, when it comes to makeup and aging skin LESS is always MORE!

Aging Skin Makeup Tips

#1. Concealer

When it comes to concealer, choose an age-defying concealer which will fill in fine lines, and cover up dark spots and age spots. Revlon’s Age-Defying Concealer is a very good, inexpensive concealer which fills in fine lines and covers up dark spots and age spots in a pinch. Apply the concealer in a triangle shape underneath the eyes, around the mouth, and over any dark spots. Blend into skin by dabbing with your fingertip or a beauty blender – do not RUB in.

#2. Foundation

Just like with concealer, choose an age-defying foundation. Always go with a foundation that caters to YOUR skin! So if you’re looking for a “lift” and an anti-wrinkle foundation, choose one that does just that! I like L’Oreal’s Visible Lift Serum Absolute Advanced Age-Reversing Makeup. Only $12, this foundation has amazing reviews from women over 50 as it flawlessly hides fine lines, wrinkles, and dark spots. It’s also light weight, and gives off a dewy, youthful look.

#3. Powder

Set your makeup with a translucent powder. Any translucent powder will work – this is so your makeup will stay on all day, prevent oiliness, and give your skin a perfect, matte look!

#4. Blush

Foraging skin, a very light, pink-tinted blush should be applied. Like I said above, less is always more when it comes to aging skin and makeup application. So apply a small amount of blush to the apples of your cheeks and you’re good to go!

#5. Eyeliner

Apply liquid eyeliner only on the top lid, and never on the bottom. Applying eyeliner to the bottom lids will make your eyes look smaller and draw attention to lines around the eyes. Instead, line the lower lid with a white eyeliner or white eyeshadow so that eyes will look bigger. Read more

Also read: DIY Bentonite Clay Hair Mask Recipe

DIY Bentonite Clay Hair Mask Recipe

0

We all know about bentonite clay face masks, but what about DIY Bentonite clay hair masks? Bentonite clay has been used for centuries for a number of different things, including face masks, but now, bentonite clay hair mask recipes are making a big splash. For natural hair especially, bentonite clay is said to be a clarifier which draws out impurities and reduces flakiness. Much like the same way bentonite clay works on skin, it also works on hair.

Those with natural hair that has used a bentonite clay hair mask have reported moisturized, frizz-free, shiny, and curl defined hair. Does it really work though? We dug in a little deeper to see if bentonite clay hair mask recipes are all they’re cracked up to be!

Bentonite Clay Explained

Clay has actually been used by people for thousands of years for a number of different things. At its source, bentonite is sourced from volcanic ash and is an absorbent aluminum phyllosilicate clay. What this means is that the bentonite can get rid of toxins with a negative charge, whether this is internally or externally, such as on skin or hair.

What Are the Benefits of Bentonite Clay for Natural Hair?

Many people ask this question, and we’re here to answer it! Although there has been no scientific proof, bentonite clay has been used for hundreds (if not thousands) of years to soften and cleanse natural hair. There IS concrete evidence, however, that bentonite clay is very beneficial to the skin, and is therefore beneficial to the scalp. A healthy scalp means healthy hair.

Bentonite clay is great for those with natural hair, itchy scalp, and those who suffer from dandruff. The clay cleanses and exfoliates the scalp, and in turn, softens the hair, and also encourages hair growth. Bentonite clay also creates a protective barrier and helps to heal minor wounds. See more benefits of bentonite clay!

DIY Bentonite Clay Hair Mask Recipe

This DIY recipe is all-natural and uses bentonite clay, water or apple cider vinegar, and essential oils (optional). Depending on the type of hair you have, you may want to add additional ingredients, such as carrier oils, but they can also be left out. We love using bentonite clay in conjunction with apple cider vinegar, but you can also use water.

One very important thing to remember when making a bentonite clay mask (whether it be for the face or for the hair), is to use non-metal bowls and stirring utensils. This is because the clay absorbs the metals and becomes less effective.

Ingredients:

  • 1/2 cup bentonite clay powder (we like Aztec Secrets Indian Healing Clay)
  • 3-9 tbsp water (this is dependent on whether or not you’re using apple cider vinegar or essential oils).
  • 6 tbsp apple cider vinegar – optional (if not using ACV, use water)
  • 3 tbsp carrier oil of your choice – coconut, olive, almond, avocado, etc…
  • nonmetal bowl and utensils

Directions:

  1. Start by measuring the bentonite clay and add to a non-metal bowl.
  2. If using any carrier oils, mix them in with the clay now.
  3. Then, add your water or apple cider vinegar and stir the concoction using a wooden or plastic utensil.
  4. Let the mask aerate for a few seconds.
  5. Stir really well until the consistency is yogurt-like.
  6. If you feel like the mask is too thick, add a little bit more water.
  7. If it’s too thin, add a little bit more clay.

How to Use the Bentonite Clay Hair Mask

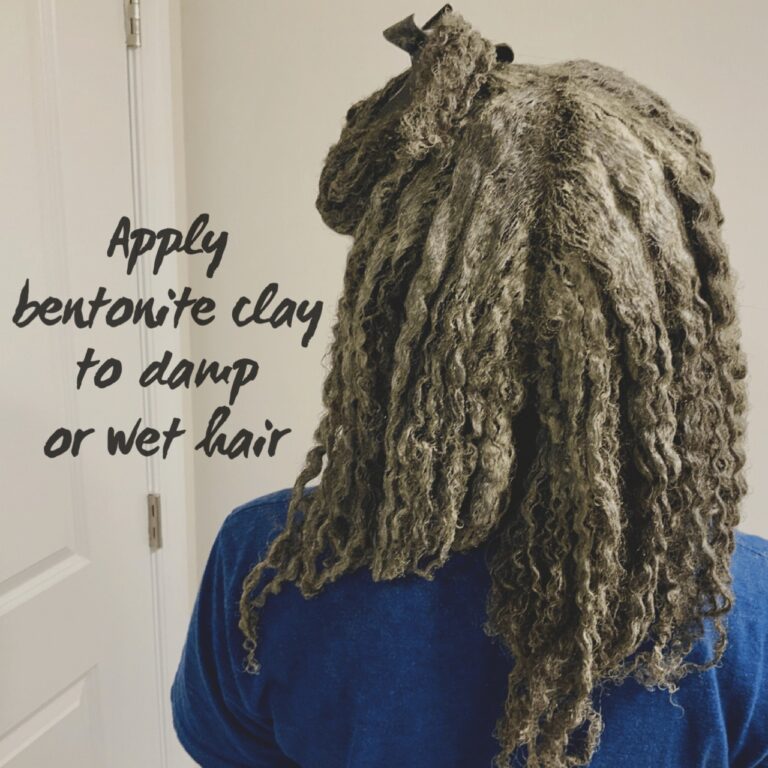
This mask should be applied to wet or damp hair. This does not mean you have to wash your hair before a bentonite clay mask. It simply means the hair should be wet, so just a quick rinse is enough. The most important thing to remember is to saturate the entire head. If your strands get dry during the process, be sure to have a spray bottle with water nearby. Read more 

Also read:Dermaplaning: How to Dermaplane at Home