Home Blog Page 369

Natural Lash Lift Treatments

Heard about lash lift and have no idea what it is? Well, you have come to the right place because today we will be talking all about lash lifts, what it is, its benefits, and share a few natural lash lift treatments you can do at home!

Natural Lash Lift Treatments

#1. Oils for Natural Lash Lift

Mother nature always has us covered and for lash lifts, one of the best natural methods is using natural oils that will help us achieve that long and thicker eyelash look!

Castor Oil

Castor oil has amazing extreme hair growth properties making it one of the best oils you can use to lengthen your lashes.

Instructions:

  1. Grab a Q-tip and dip it in Castor oil.
  2. Gently run the Q-tip along the base of your lashes.
  3. Apply the treatment every day during a month and start seeing the difference after 2 weeks!

Lavender Essential Oil

Lavender essential oil is an excellent oil that helps to encourage hair growth making your lashes fuller and thicker all in a natural way. The soothing lavender scent will help you sleep nice and tight!

Instructions:

  1. Using a Q-tip, apply the lavender oil at the base of your lashes.
  2. Do this every night for at least 30 days.

#2. DIY Lash Lifting Serum

This recipe helps you get thicker and longer lashes naturally, using only natural and easy ingredients that you might already have at home!

Ingredients:

  • 1 tbsp Aloe Vera
  • One tbsp Castor oil
  • 1 tbsp Vitamin E oil

Directions:

  1. In a small bowl, mix all ingredients well.
  2. Store in a small, airtight container.
  3. Using a cotton swab or just your fingers, apply nightly onto your lash lines.
  4. Best used before bed.
  5. Use this every night and within a few weeks you’ll notice a huge difference.

#3. Oil Mix For Longer Lifted Lashes

This mix of nourishing, natural carrier oils will work amazingly to help your lashes reach a longer length. Super easy to make and will cost you almost nothing.

You’ll need:

  • 2 tsp camellia seed oil
  • 2 tsp cucumber seed oil
  • 1 tsp apricot kernel oil
  • one tap argan oil
  • 1 clean mascara tube

Directions:

  1. Mix all the ingredients in the clean mascara tube well.
  2. After combining well, apply a few coats on your makeup-free lashes every night.
  3. Do this every night for about a month. Read more……….

Also Read: How to Use Grapeseed Oil For Hair Growth & More

DIY Lavender Lip Scrub

0

Using a lip scrub on a regular basis can ensure softer and smoother lips, which, in turn, makes for a better lipstick application! Over time, our skin tends to accumulate dead skin cells, which results in dryness and flakiness. This DIY lavender lip scrub will gently exfoliate lips to reveal softer, smoother, and brighter lips!

DIY Lavender Lip Scrub Recipe

honey lip scrub

This recipe is really great because you make it in literally less than 2 minutes and requires all natural ingredients that you probably already have in the house!

This recipe uses raw sugar, raw honey, coconut oil, and lavender essential oil!

Raw sugar is great for this recipe as it gently exfoliates the lips, leaving them super soft and smooth! Be sure to use a fine sugar or if not, pulsate the sugar a few times for a finer consistency.

Raw honey has antibacterial and antimicrobial properties, making it ideal for a sugar scrub, especially when used on the lips! Not only does it taste yummy, but will also nourish dry lips!

Coconut oil has nourishing and moisturizing properties, which will leave lips feeling and looking smooth and shiny. If you don’t have coconut oil on hand, you can substitute for any other carrier oil such as extra virgin olive oil, avocado oil, sunflower oil, etc…

Lavender essential oil has calming and soothing properties, not to mention is smells really great! Adding lavender essential oil to any lip or body scrub will ensure for soft, smooth skin!

Some Notes:

lavender lip scrub
  • If you want a rougher exfoliation, reduce the coconut oil to 1 teaspoon.
  • If you feel like it’s too rough for your lips, simply add a little more coconut oil!
  • You can store this in your bathroom or in the shower, but just be careful not to get any water in it, as it will shorten the shelf life!
  • If you’re looking to give this away as a gift, or want it to last longer, simply add a few drops or capsules of vitamin E! Vitamin E will not only ensure it will keep longer, but it also helps to smooth the skin.

Ingredients:

  • 1 tbsp cane sugar or brown sugar, fine
  • 1 tbsp raw honey
  • 1 tbsp organic coconut oil or other carrier oil of your choice
  • 1-2 drops lavender essential oil

Directions:

  1. In a small bowl, mix all ingredients together until well combined.
  2. Adjust for personal preference if needed.
  3. Scrub onto wet lips with your fingertip, massaging in slow, circular motions.
  4. Rinse off, pat dry, and follow up with a homemade lip balm to lock in moisture.
  5. Use once or twice a week for super soft, kissable lips!

Read more 

Also read  How to Treat an Infected Pimple

Shea Butter: How Good Is It For Your Skin And Hair?

Shea butter is a nutrient-rich cosmetic butter containing good amounts of vitamins and fatty acids. It highly beneficial and is now widely used in various cosmetic products like lotions, moisturizers, anti aging night creams, foot cream, shampoos, nourishing Hair conditioners and various other treatments.

What Is Shea Butter?

It is a fat that is derived from shea nuts of the shea tree. It usually remains solid at a warm temperature and is ivory white in colour and appearance. The shea trees are native to Africa and that is why most of the butter is obtained from the countries in West Africa.

It has been used as a core ingredient for cosmetic products for centuries and there are so many benefits of shea butter. It is highly rich in fatty acids and vitamins, due to which it plays an important role in soothing and conditioning the skin.

Shea Butter Benefits

It benefits our skin and hair in a lot of many ways. It offers mild protection from the UV radiation and provides the skin with an adequate amount of fatty acids which are sufficient for regular collagen production.

It contains ample vitamins and fatty acids which can play an important role in moisturizing our skin. Thus if someone is having dry skin, then products containing this are highly recommended.

It has also been discovered that Shea butter is anti-inflammatory and avoids skin mutations. Thus it can also treat acne-related problems.

It increases the body’s collagen production and prevents the skin from getting dryer. It is rich in antioxidants which helps in smoothening the skin and prevent wrinkles.

Shea Butter For Hair

Shea butter has been used for centuries to cure dry itchy scalp and dandruff. It goes deep into the root and provides moisture to each and every layer of the hair and scalp. It even has emolliating properties due to which it locks the moisture in your hair without making them greasy or heavy.

It also protects you from treatments which require lots of heat. This is great for softening of natural hair and thus helps in treating curly, fragile and dry hair. Thus it is a key ingredient of deep hair conditioner, Revaltilizing shampoos, hair masks & other hair care treatments.

Shea Butter For Face

It has anti-inflammatory properties and even reduces the redness or swelling on the face. It has been reported that it even has anti aging properties because of its effect on collagen production. Thus by increasing the collagen synthesis, it makes the skin of the face appear smooth, clear, lightened and free from wrinkles.

……Read More…..

Read Also: How to Treat an Infected Pimple

How to Use Grapeseed Oil For Hair Growth & More

If you’re like us, and you love using natural products on your hair and skin, then you’ve no doubt heard of grapeseed oil and its amazing benefits. In this article, we’ll talk about how to use grapeseed oil for hair growth, dandruff, and other hair problems. It has a slew of benefits for the hair, but first we’ll take a quick look at WHY it’s so beneficial and what you can get out of it.

Grapeseed Oil for Dandruff

Because grapeseed oil contains antioxidants, it’s an excellent oil to use for those with dandruff. Packed full of hydrating compounds, this oil deeply penetrates the hair shaft to moisturize dry hair and scalp, and also encourage sebum production. Dandruff is produced when the scalp is dry and itchy, but grapese oil can reduce the dryness and heal a dry, itchy scalp in an efficient and natural way. Grapese oil also helps to exfoliate the scalp, getting rid of dead skin cells that may have accumulated.

Grapeseed Oil Hair Mask for Hair Growth, Hair Loss, and Dandruff

Use this quick and easy grapese oil hair mask 2-3 times a week to prevent hair loss and thinning, strengthen hair, encourage growth, and stop dandruff in its tracks!

Equipment

  • warm towel

Ingredients

  • 2-3 tbsp grapeseed oil

Instructions

  • In a microwave safe bowl, heat 2-3 tbsp of grapeseed oil for a few seconds.
  • The oil should be just warm, and not hot.
  • Pour the oil directly onto the scalp and use your fingers to massage the scalp in slow, circular motions.
  • Spread the oil to the rest of the hair, making sure to get the ends.
  • Wrap the hair in a warm towel (optional) and leave oil in for at least 30 minutes.
  • For best results, leave oil in overnight.
  • Wash out with warm water, and follow up with a sulfate free shampoo and conditioner.
  • Repeat 2-3 times a week. Read More…………….

Also Read: Homemade Brightening Face Mask

THERE IS A PERFECT PAPAYA FACE MASK FOR EVERY SKIN TYPE

We love ourselves some yummy DIY face masks! They are easy to prepare, all the ingredients are already available in your kitchen and are a no-nasties TLC option for your skin. We especially love fruit face masks. Rich in antioxidants and minerals, they are as good for your skin from the outside as they are from within. Fruity face masks that are vibrant to look at are an added plus and what better way to make one for your Insta feed than with a delightfully tropical papaya face mask!

Benefits of papaya for skin

  • Papaya Moisturises skin – The nourishing enzymes present in papaya do wonders for moisturizing your skin. It is rich in potassium, a compound which is known for hydrating skin from within.
  • Papaya Fades pigmentation – The enzyme papain present in papaya works as an exfoliator and helps slough off dead skin cells gently. Enriched with beta-carotene, enzymes and phytochemicals, it further helps lighten pigmentation marks like acne scars and age spots.
  • Papaya Reduces dark circles – Papayas have been used as a natural bleaching agent in beauty routines for ages. As such, they are a good way to treat dark circles and help reduce discolouration and pigmentation.
  • Papaya Controls acne breakouts – The fruit and leaves of the papaya plant contain proteolytic enzymes in them, which can control acne and breakouts. They also soothe and calm redness and inflammation that comes along with pimples to make them less painful.
  • Papaya can help soothe eczema and psoriasis symptoms – It is generally not recommended to use DIY treatments for advanced skin issues like eczema and psoriasis. But given that papaya is gentle and cooling, it can be used to ease symptoms like itching and redness caused by these issues.

Read More

Also Read: How to Treat an Infected Pimple

How to Treat an Infected Pimple

0

It’s a terrible truth we’ve known since puberty: there are pimples. While certain whiteheads can be easily treated with some TLC, more severe cases require serious techniques, and learning how to treat an infected is essential epidermal education. To get all the right answers, we spoke with esthetician Nichelle Temple, owner of Inderma Studio in NYC.

1. What are the signs of an infected pimple?

An infected pimple is hard to miss. Temple points to four telltale signs: the pimple is larger in diameter than your typical zit with inflammation, pain and visible pus.

2. How does a pimple become infected?

It’s not a pretty picture. Temple describes, “As dead skin cells and bacteria build up and fester under the pimple,” the area becomes swollen and a pustule can form. A pustule is an inflamed pimple with a white or yellow center containing pus. An infected pimple is pretty rare, and it’s usually self-made. With new pimples, the impulse is to poke and prod, but Temple tells us this is the cause of most infections. She says, “The more you poke and prod the pimple without proper technique and products, the more likely it is for it to become infected.”

3. What can you do, at home, to treat an infected pimple?

When you notice a new pimple coming to town, Temple recommends “using a spot treatment with a high concentration of benzoyl peroxide, salicylic acid, resorcinol or sulfur.” Then, she stresses, leave it alone. These ingredients are particularly effective as they help to dissolve follicular buildup. A particular favorite of Temple’s is The Acne Control Regiment by PCA Skin.

The only time Temple suggests DIY extraction is when you notice the white pus starting to push its way out of the pimple. Then, wait to do anything until after a steamy shower. “Cleanse and disinfect the area thoroughly,” she says, then “wrap your fingers in a tissue and gently apply pressure with two fingers North/South and then East/West (top and bottom and then side by side) in a gentle rotation until the head of the pustule is out.” Quickly disinfect the area with a salicylic acid based toner and then leave it be.

4. When should you see a doctor?

Keep it simple: if you’re suffering, you should see a doctor. If your pimple is causing a deep, throbbing under the skin, your doctor could administer a cortisone shot. They may also offer a prescription if you suffer from chronic breakouts. Another option, Temple reminds us, is to “schedule an extraction-based facial or chemical-peel facial with an esthetician.”

Read more 

Also read  The Correct Order of Skin Care Products

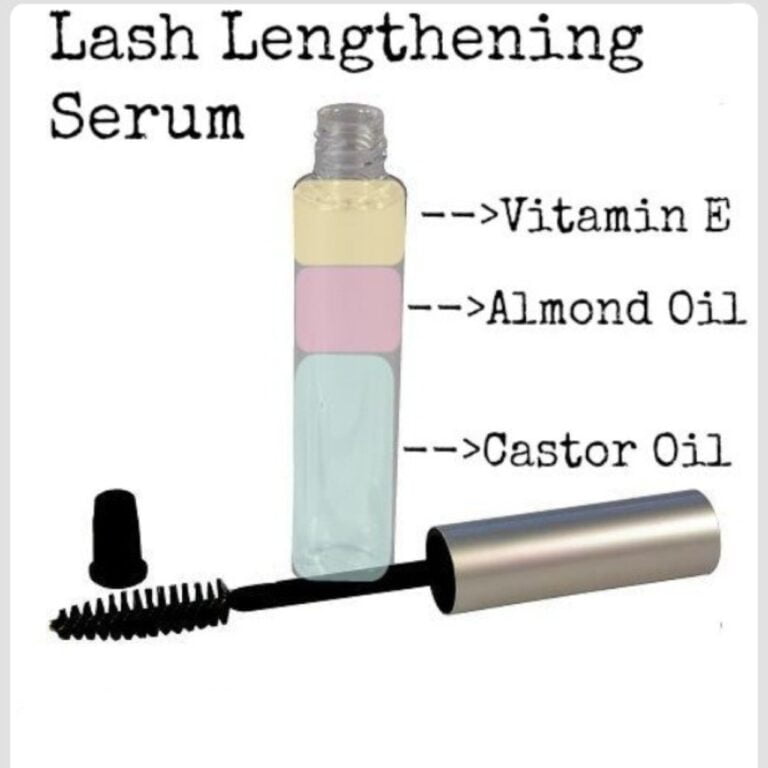
DIY Eyelash Lengthening Serum

0

This DIY eyelash lengthening serum has been tried and tested by us as well as hundreds of other beauty bloggers, and we SWEAR by it! For the longest time, I couldn’t grow my lashes no matter what I tried, and so I started buying all kinds of different eyelash lengthening products but I was only wasting my money. After a year, a few hundred dollars, and a lot of frustration, I finally gave up! My eyelashes just didn’t want to grow for whatever reason. But then, I came upon the holy grail that is this DIY eyelash lengthening serum!

Homemade Eyelash Lengthening Serum

You’ll Need:

Directions:

  1. Clean the container really well and let dry.
  2. Fill the container with about 1/4 castor oil, 1/4 aloe vera gel, and 1/2 with vitamin E oil.
  3. You can source vitamin E oil simply by breaking apart vitamin E capsules.
  4. Shake as well as you can and apply directly to lashes (as if you were applying mascara) before bed. Leave on overnight.
  5. Repeat every single night (or as often as you remember).
  6. You’ll start to notice growth and thickening within a month.

Why This Works:

Castor oil has long been known and associated with hair growth. The properties it contains encourages hair growth like nothing else, and it’s also moisturizing. Aloe vera gel will also help lengthen the lashes all the while moisturizing them. And vitamin E oil will accelerate the length of your lashes. Combined, these 3 ingredients make the perfect trifecta for super long, thick lashes in no time.

We’ve tried it and it worked for us, when nothing else did! So give it a try and let us know how it goes for you! Read more

Also read: Orange & Grapefruit Hand Cream Recipe

Homemade Brightening Face Mask

This homemade brightening face mask will work hard to slough off dead skin cells, hydrate,and leave skin bright and glowing! Say goodbye to dull, drab skin once and for all! Made entirely from natural ingredients, this homemade brightening face mask is easy to make, and will enhance your skin’s natural skin tone after just one use!

Homemade Brightening Face Mask Recipe:

Let’s take a look at some of the ingredients we’ll be using in this brightening face mask and WHY they’re so effective:

Brown Rice Flour
Pretty self explanatory, but brown rice flour is exactly what it sounds like: finely ground up brown rice kernels! It contains a high amount of vitamins C and B5, which are actually naturally brightening. Brown rice flour also helps absorb excess sebum in the skin (oil), and is therefore great for those with oily/acne prone skin. If possible, try to use organic brown rice flour! You can find rice flour at your local grocery store!

Orris Root Powder
This plant based powder is made from the orris root which is the root of the Iris flower! This finely ground powder has been used for centuries for its medicinal properties, and in this instance, can help with cleansing and detoxifying the skin. If possible, try to use organic orris root powder! You can find orris root powder online such as on Amazon, as well as your local health store!

Chamomile Flower Water
This floral water is made from chamomile flowers which is extremely beneficial for the skin. It will help to reduce redness, calm the skin, and also hydrate. Look for a hydrosol (flower water) that is 100%, meaning it should ONLY contain water and chamomile flowers.

Ingredients:

Organic Brown Rice Flour
  • 1 tsp organic brown flour
  • 3 tsps chamomile flower water
  • 1 tsp orris root powder

Directions:

  1. To a small bowl, add all of the ingredients. Stir well until a thick paste forms.
  2. If the mask is too thick, add a little more liquid. If it’s too liquidy, add more flour.
  3. Apply the mask to (cleansed) skin and leave on for 10 minutes. Be sure to remove right before it starts to dry out.
  4. Wet your fingers and scrub the mask into the skin for about a minute and rinse off completely.
  5. Pat dry and follow up with a DIY toner and your daily moisturizer.

This face mask is safe to use once or twice a week! Read More………

Also Read: The Correct Order of Skin Care Products

Orange & Grapefruit Hand Cream Recipe

This energizing orange & grapefruit hand cream recipe is fairly easy to make, doesn’t require many ingredients, and will leave your skin hydrated and smelling amazing! This recipe contains all-natural ingredients, and once you acquire them, the possibilities for making many different cosmetics and products are endless!

To make this orange & grapefruit hand cream recipe, you’ll need a small scale to weigh your ingredients. As with baking, making your own beauty products can be an exact science.

Orange & Grapefruit Hand Cream Recipe

You’ll Need:

  • 10 tsp distilled water
  • 2 tsp aloe vera liquid
  • 3 tsp jojoba oil
  • 1 tbsp cocoa butter
  • 7.5 grams emulsifying wax
  • 2 grams beeswax
  • 4-6 drops grapefruit essential oil
  • 2-4 drops sweet orange essential oil
  • preservative of your choice (optional if you want it to last a lot longer)

Directions:

  1. To a double boiler, add the distilled water and aloe vera and stir until warm.
  2. In a separate bowl, add the jojoba oil, cocoa butter, emulsifying wax, and beeswax, and melt in a double boiler method.
  3. Once melted, combine the two together and stir, stir, stir until mixture begins to thicken.
  4. Once cooled a little, stir in the essential oils and preservatives if using.
  5. If you’re not using a preservative, keep in the refrigerator and use it within a week.

Benefits of Orange & Grapefruit Hand Cream:

This hand cream can be used on the entire body to soften skin, hydrate, and smooth out any imperfections. We love this recipe because it smells SO so incredibly good, plus the ingredients are all-natural!

We realize most people won’t have these ingredients on hand, but if you love making your own products, these are all ingredients you SHOULD have. The possibilities are endless! Read more

Also read: Chocolate Chip Cookie Dough Body Scrub Recipe

Chocolate Chip Cookie Dough Body Scrub Recipe

This chocolate chip cookie dough body scrub is a scrumptious take on the edible cookie dough…but for your skin! Say hello to smooth skin!

Sometimes I make cookie dough with the disguised intention of making cookies, but really I just want to eat the dough. But let’s be honest, who doesn’t love eating cookie dough? Recently, I switched gears and started making cooking dough with a completely different idea in mind and this time I didn’t need to preheat the oven… I decided to make a cookie dough body scrub! And while this recipe is totally spoon-lickable, it is even better used as an exfoliating, hydrating and nourishing scrub for the whole body.

Both brown and white sugars work wonders as natural exfoliating agents to remove dead skin cells. Salts contain minerals that help to replenish the skin and reduce inflammation. Coconut oil further hydrates and nourishes, giving skin a healthy glow. Honey helps lock in hydration and vanilla oil further helps to improve skin’s overall health.

Chocolate Chip Cookie Dough Body Scrub